Using the Whole Animal Workshop

2017-pig-class-flyer

“USING THE WHOLE ANIMAL”
PIG SLAUGHTERING & PROCESSING WORKSHOP
with Tamara Wilder

MARCH 11 & 12 , 2017 (Saturday & Sunday)
9am – 6pm daily
(with 6-8pm potluck feast & optional camping Saturday night)
Petaluma, CA

Many people who eat meat feel that they are out of touch with the sources and processes behind the food that ends up on their plate.
The knowledge required to efficiently and humanely process an animal into food is an essential tool for self sufficiency.

Pigs are also considered to be one of the most “edible” of animals, meaning that every part can be easily transformed into a delicious dish.
Being omnivorous “garbage disposals” that consume garden, orchard and dairy surplus and transform it into delicious meat & fat, pigs have long provided a staple of food and fat for homesteading families.

Pork is particularly desirable as a meat because it is very good fresh but is also exceptionally tasty when cured and smoked into bacon and ham.
The fat also provides an essential staple for baking and cooking when rendered into lard.

As a group we will slaughter and process a domestic pig.
This includes:
– extracting the innards (heart, lungs, liver, spleen, blood, fat, etc…) and preparing them for a delicious potluck dinner,
– processing the other miscellaneous parts (tongue, ears, head, skin for pork rinds, stomache, intestines for sausages, bones for bone broth, fat for lard),
– cutting the carcass into usable pieces;
– grinding meat & fat and stuffing them into intestine casings

COST: $300 – $375 sliding scale (includes seminar, potluck-style Sat feast, tools, materials & portion of meat and products such as bacon, bone broth, lard, etc….. that we create)

$150 deposit and registration form holds your space.

Registration Form & ?’s: Cole 707-364-4462 or email **colesmith194969@gmail.com
**please note that email on flyer is different and use this one instead. Thanks:)

Honoring the Ancient Fibersheds Blog


In planning for the upcoming Spiritweavers Gathering (where I am planning on helping Bethany Ridenauer teach a class on braintanning rabbit furs),  I just found this old Fibershed blog from 2011 called   Honoring the Ancient Fibersheds.

bethany-ringing-hide

It’s from a braintanning class in Bolinas where  Bethany was helping out and has some incredible photographs of the whole process. Check it out:)


Hand Drill Friction Firemaking Video

Check out this fun video of a recent Friction Firemaking Class at
Occidental Arts & Ecology Center in Occidental, CA.

This morning Intro to Paleotechnology program with Tamara Wilder is part of their 2 week long Permaculture Design Course which happens 3 times each year (Spring, Summer & Fall) and which includes an overview discussion, soapstone beadmaking, stringmaking & firemaking hands-on experience.

INTERESTED IN LEARNING MORE? 

OAEC PDC Registration Information.

A similar Stringmaking & Firemaking program is also part of the Roots of Herbalism / Foundations in Health Course at California School of Herbal Studies.

Friction firemaking is also a core element in Tamara’s Ancient Living Skills School Programs.

Video Series on Making Quality Hide Glue

hideglue header

Howdy folks.  I’ve been MIA on the Paleotechnics blog for a while.  I spent quite a bit of my time, thought and energy this last year focusing on recovering my health and on audio/visual stuff for making videos.  The good news is that my health has been considerably better and I’m getting pretty well set up for shooting decent quality videos, though I still have a lot of progress ahead of me in both goals.

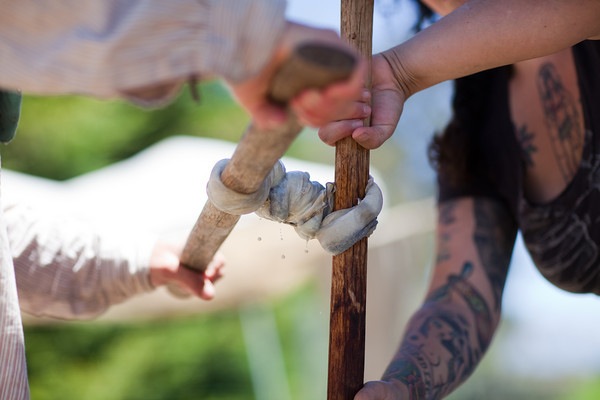
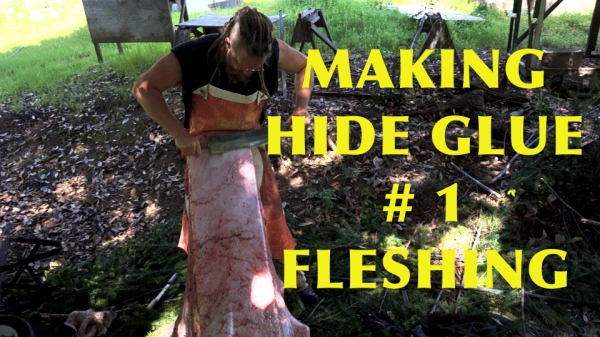
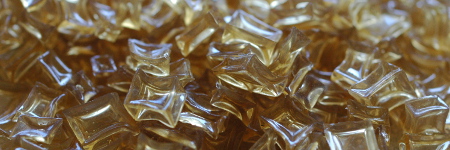
I’m shooting a video series on making high grade hide glue.  At least that is the goal, we’ll see when I test the glue after it’s finished, or maybe have it tested.  The third video, on liming, is uploading to YouTube as I’m typing this.  The approach is a sort of learn as you follow along kind of thing, going through the process of turning a cattle hide from Tamara’s recent cattle processing class into hide glue.  Every time I go to work on the skin, I take some video and edit it down.  One section is sort of a lecture type deal with some chalkboard action, one is on fleshing and, aside from the liming one uploading now, the others will be de-hairing and de-liming, cooking and pouring, then finally cutting and drying.  Maybe at some point there will be one on testing the finished glue.

In the first video I got off to a rough start.  I had just done a shot the night before (LDI, Low Dose Immunotherapy, or LDA) that is something like an allergy shot for systemic autoimmune type issues (including lyme disease related things for you lymies out there).  I was pretty wonky from the initial immune reaction including a low grade fever for most of the day.  In spite of all that I had unusual energy and managed to flesh the entire skin and get it in the lime bath.  So, in the beginning I look kind of like a rat that was partially drowned and hung up overnight to dry and I’m fairly brain dead to boot, but I snap out of it pretty quick, so hang in there!  The LDA Shot seemed to work though!  I’m getting the next one soon and I’m hopeful that I will continue to feel increasingly better and able to bring you good content more often.

This hide glue series will be fairly long, but there are things in there to learn beyond making hide glue.  Little snippets about other stuff relating to tanning skins and such inevitably work their way in.  No process is an island after all.  So far these videos have been decidedly lacking in popularity and the total number of people that really get a lot out of this will probably not be that many.  But it will be there when people are ready for it, and that is most of the reason I do this stuff at this point, as a reference archive and so it doesn’t all die with me one day.  Personally, I think it’s really cool, even though I’ve so far mostly restrained myself from going on long tangents about multiple related processes and ideas.  Poking around looking at other hide glue videos on youtube, a lot (or most?) of them use rawhide chew toys cut up in pieces.  Nothing wrong with that in context I suppose, but that has never been what we, or the genesis of Paleotechnics, has ever been about.  I’m definitely bringing you something closer to the ground up version.

The link below goes to the main Playlist into which all videos in the series will be placed as they come out.  I think anyone with any kind of google account, like Gmail, can subscribe for updates.  My channel, for now, is a mixed bag of stuff I get up to.  I’m also currently also doing a series on amateur apple breeding, which will follow my progress over the years attempting to breed up some new red fleshed apples here at the Turkeysong experimental homestead.  For the hide glue series,  I’m in the dehairing/refleshing/deliming process now, so that one should be up soon.  When finished, I will probably sell the glue on Etsy.  If that works, maybe I’ll add artisan hide glue making to my list of little income sources.  Artisanal hide glue for artisanal artisans, you know instrument makers, fine artists who use traditional materials, fine woodworkers that want their furniture to be fully repairable in the future and the likes of them.  People who are keepin’ it real!  See ya…


Seasoning Bones: How to avoid cracking in drying bones

bone seasoning header Bone is a beautiful and useful material, but if you pick up any random bone from the yard, or one that has been buried, it may very well be cracked.  That is because bones contain quite a bit of water and, like wood, when drying bone is subjected to stresses caused by shrinkage.  Something has to give if the stress is high, and the bone will start to come apart along the grain forming “checks”.  Rules similar to those for drying wood without checking can be applied to bone.

Typical cracking along the grain of the bone.  Bone, like wood, has a grain direction.

Typical cracking along the grain of the bone. Bone, like wood, has a grain direction.

Size matters:  Like a large piece of wood, a large bone is more liable to crack than a small one.  Small bones will often dry without cracking regardless of how they are dried.  If I bury a leg and dig it up a year later, none of the small toe bones will be cracked, but most of the larger leg bones will have checks in them. Speed matters:  Drying things fast causes more stress than drying things slow.  That is because when things dry they shrink.  As the outside, which is drying faster, shrinks, it has to shrink around the plumper, slower drying interior and cracks are liable to form in the outside.  It helps quite a bit that bones are hollow.  One way to decrease checking in wood is to bore a hole through the center.  But, see next… Bone is very dense:  Dense materials tend to check more easily than less dense materials.  Very heavy dense woods are more liable to cracking in general than light porous woods for instance.  So, even though bones generally have the advantage of being hollow, they still have a strong tendency to check if not dried in a controlled way.  If a bone was at thick as a tree or split piece of wood, I doubt there would be much that you could do to prevent checking, or at least it would take extreme measures. Control drying:  The best way to avoid checking is to control the speed of drying, and there are several ways to do this.       *Humid environment:  Drying in a humid environment slows moisture loss, and that’s what it’s all about.  If the moisture loss is gradual, moisture from the interior of the bone has time to redistribute throughout the bone, resulting in more even moisture loss, which translates to less stress on the bone’s structure.       *Slowing drying of the exterior with a coating:  Coating the bone with something to slow the drying of the exterior will also allow the whole bone to dry at a more even rate, greatly reducing the likelihood of checking.  Using animal fat is easy and effective.  Fat can also seep into the bone replacing some of the water. Read the full post »

Some very cool films on Acorn and Buckeye Processing

There are lots of ways to process acorns.  These neat old films show traditional processing in enough detail for a person to really learn something.  Processing of the California buckeye is much less common, but this video shows how it is done.  The buckeye nuts are poisonous raw, but they are not hard to process and it shouldn’t be overly intimidating.  It’s also just really great to watch these ladies at work with their deft hands, and listen to the singing, which is,  for lack of a better description, very grounding.   Thanks to the wonders of the information age, these once very hard to get films are now available to see.  Check ’em out!


Paleotechnics Radio Interview with Tamara Wilder

Blog posts will likely be sporadic and few, at least until the busy spring segues into summer.  In the meantime, here is an interview with Tamara on a local radio show, in which she talks about her work and paleotechnics philosophy type stuff

Lampblack, what it is and what it’s good for

lampblack header

Lampblack is a form of carbon.  You can think of it as something like very, very finely divided charcoal.  Because it is so incredibly fine, a small amount covers a large area giving an intense black color.  It forms the basis of the best traditional black inks and has been used to many other ends from shoe polish to blackening gun sights.  Lamblack’s extreme opacity and complete resistance to fading are excellent characteristics for use in the arts

Lampblack can be made from burning oily or resinous materials, while collecting the resulting soot.  The pitch of pine trees and other conifers make good lamp blacks, as do oils burned with a wick.  It has also traditionally been collected from the inside of oil lamp mantles (the clear glass covering over oil lamps), thus the name.  The trick to producing it yourself is to burn the material in such a way that combustion is incomplete.  When combustion is complete, the carbon is fully burned, but if the flame is interrupted, or just plain inefficient, some of the carbon remains as soot along with other unburned chemicals.  The rising black soot can be collected on a metal plate, bowl or flat stone.

Using a large and lumpy, or long, wick will usually create a lot of soot.  Another way to create incomplete combustion is to interrupt the flame.  You may have noticed that when an object is held in a candle flame, soot results.  When the wick is trimmed or made properly and the flame is burning cleanly, the carbon will be completely burned to up at the tip of the flame and no soot results.  The truth is that it is somewhat challenging to make wicks which do NOT soot!  The modern candle wick is an exception, not the rule.  But for making lampblack, you want a whole LOT of soot, so make that flame as dirty as possible.

Flame interrupted.

Flame interrupted.  Note, the soot on the right as the flame combustion is disrupted.  Either making an inefficient wick or disrupting the flame, or both, will result in the production of lampblack.

Read the full post »

There’s More to Fire Than Heat, Fuel and Oxygen (or, Fire Exists Within a Sphere of Changing and Interdependent Circumstances)

f

 Fire is an interaction between Heat, Fuel and Oxygen completely dependent on proportions, conditions and physical relations.  It is not a self controlling, self adjusting system created to serve us; no, that it is not.  What fire really is, is a sometimes beautiful, sometimes terrifying expression of physical laws, chemistry and energy which can serve us without intention or harm us without malice.   Fire is the product of a universe which we can understand functionally and work with; one which does not judge, reward or punish.

By Steven Edholm

Hey all you pyros!  I wrote this a while ago.  I was going to take some relevant pictures and make it more of a tutorial, but I think it stands pretty well on it’s own and video might just be a better format to explore some of the details.  So here it is in all it’s theoretical, abstracted glory.

We’ve all heard of the three things it takes to make a fire… HEAT, FUEL and OXYGENWhile it’s true that these are essential elements of fire, it is also true that without a fourth and equally important requirement there is no fire!  Understanding this fourth requirement is key to effectively starting, controlling, utilizing and maintaining fire.  It can be understood both logically, and intuitively through experience.  It is the underlying and unifying principal of fire and no more or less dependent on the other three elements than they are on each other.   And what is the secret ingredient?  Drum roll please:  The secret is simply the sphere of circumstances in which the heat fuel and oxygen exist, which allows the chain reaction to continue or vary in quality.  Put more simply, we have to put heat, air and fuel together properly to make fire happen and continue.   And then, to expand a little further, how heat, fuel and oxygen are put together, the condition each is in, and the quantity of each affects the characteristics of the fire.  Simple?  Basically yes, but it is still something of a journey from that simple idea to effectively maintaining and managing fires for various uses.  When you factor in the many circumstances which contribute to or detract from this chain reaction and consider that we want different types of fires for different purposes it becomes less simple, but then so much more compelling!  Join me in exploring a few details of this sphere of circumstances, because it is the details, some of them minute, that make the difference in how (or even whether) a fire burns. Read the full post »

About Leg Rolled Cordage, and Why You Should Learn it.

By Steven Edholm

For many years, Tamara and I would teach leg rolling at our classes and at various primitive skills events.  We were real excited about it and started to see the usual hand twisting taught by most books and  instructors at the time, as sort of grade school level cordage making.  Leg rolling was slow to catch on for some reason, but it now seems to be more common, as it should be.  This short post is about leg rolling as compared to some other methods, and why is it worth learning, even if you don’t use it all the time.

ta

Tamara demonstrating leg rolling cordage and net making at the Oregon Country Fair

For making cordage without any props or gizmos, leg rolling is the worldwide norm.  It may have been slow to catch on in the primitive skills scene, but it seems almost universal among traditional cultures.  Leg rolling is common because it’s fast.  The cord is rolled on the thigh or calf with the flat palm, usually in an up and then down motion. With a little set up, a push down the thigh with the flat hand, and a pull back up the thigh, you’ll usually have 5 to 6 inches of cordage or so. Read the full post »